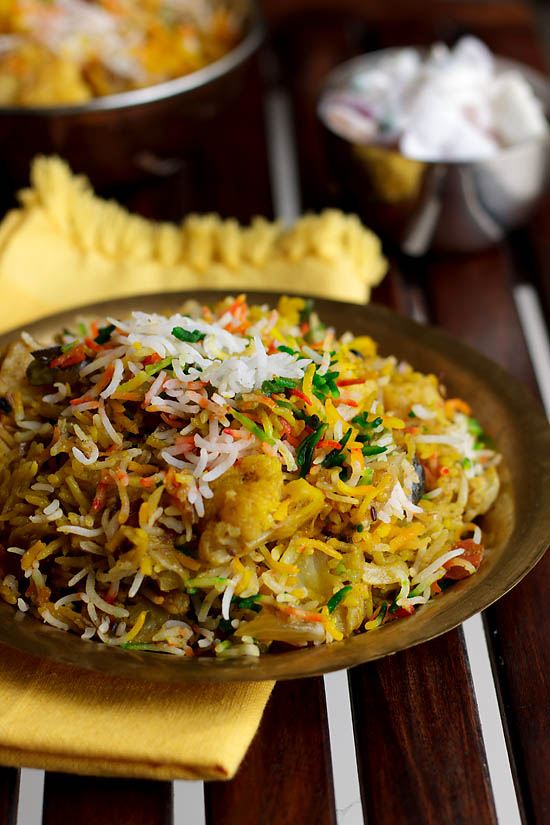
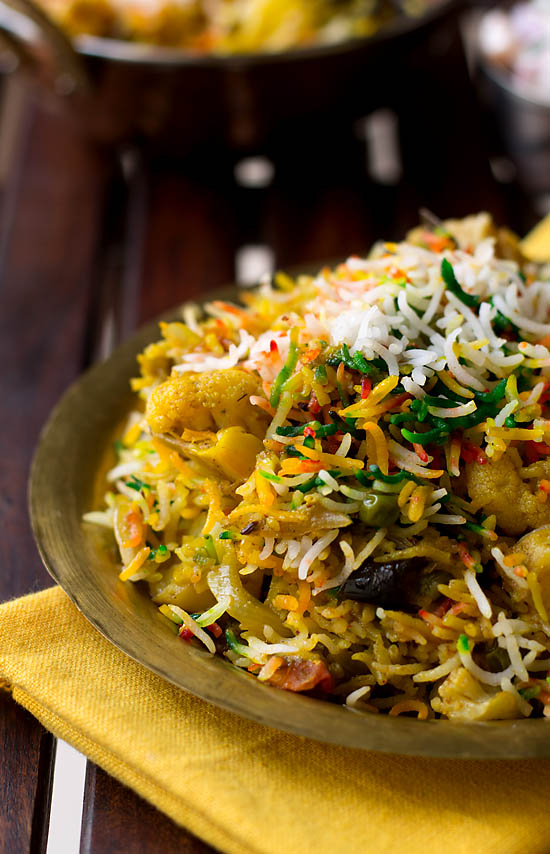
Hyderabadi Vegetable Biryani Recipe – a famous hyderabadi biryani which is layered with rice and gravy, then its cooked on dum. We love biryanis and pulaos at home be it veg or non-veg. We club vegetable biryani with onion raita, kachumber (salad) and some side dish if required.
The quantity of biryani cooked at our place suffices us over two days for two people. Also biryanis taste better the next day. Generally make them during weekends as less work for me and more time to have fun and frolic.
The challenge to make biryani is the chopping of veggies especially onion. Also second challenge is the to master the art of cooking biryanis with separated rice and not mushy rice. Third challenge is to select the basmati rice for the biryani. I would try to cover each segment that would help you in making a fruitful and flavorful biryani 😉
You would find lot of biryani coming from various region in India. Some of them are Mughlai Biryani, Awadhi Biryani, Mumbai Biryani, Calcutta Biryani, Thalaserry Biryani and Sindhi Biryani. The two main types of biryani are pakki and kacchi biryani. The first one pakki biryani has the meat or chicken which is semi cooked or cooked meat is layered with the rice and cooked. Second method kacchi biryani raw meat is cooked with the gravy and layered with rice which is slightly difficult to cook. As one needs to know the exact proportion of ingredients, rice and the cooking time for the latter process.
Cooking Method: No biryani is a biryani if it’s not dum pukht. What is dum pukht??? it’s a process where biryani is slow cooked on a dum. Dum means no air is allowed to escape from the cooking process. The biryani is sealed with the dough or aluminium foil and cooked on slow fire or heat.
Selection of rice for Biryani: In the ancient days long grained brown rice and zeera sama rice (south indian) were used. But now basmati rice is used and preferred while making biryanis or pulaos. There are several good brands like India Gate, Daawat, Kohinoor, Tilda etc. However I purchase my basmati rice which is from Dehradun sold in loose packets at Dorabjees – Pune which is perfect for biryanis and pulaos. It has a lovely aroma, taste, texture and gives me each separated rice in my biryanis and pulaos.
Chopping veggies: Slice onion a day prior to making biryani. Cover them with a lid or foil and place in the fridge. Next day would be lesser work for you all you have to do is just chop the other veggies which is not so time consuming 😉 I hope I have answered to all your doubts and queries in making a beautiful biryani.
Alternative Cooking: You could make this on stove top or even bake in the oven. I prefer both method and cook as per my convenience. I have adapted and modified this recipe from my moms hyderabadi biryani recipe. Thanks to my mother for this lovely biryani recipe
How to make Hyderabadi Vegetable Biryani recipe :
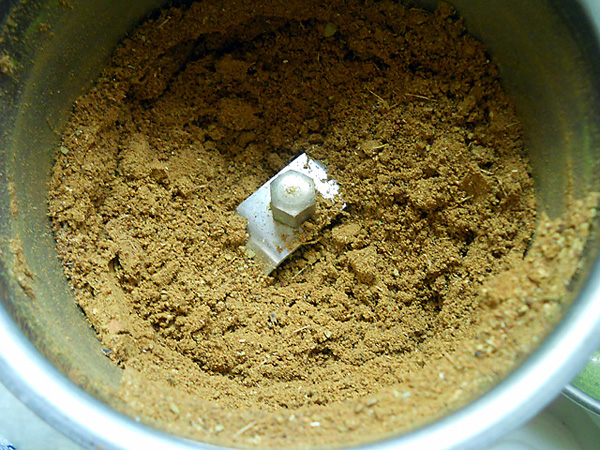
1. For the spice powder dry grind all the ingredients for the spice powder and place aside. This spice powder has to be sprinkled while layering the biryani for a fragrant biryani.
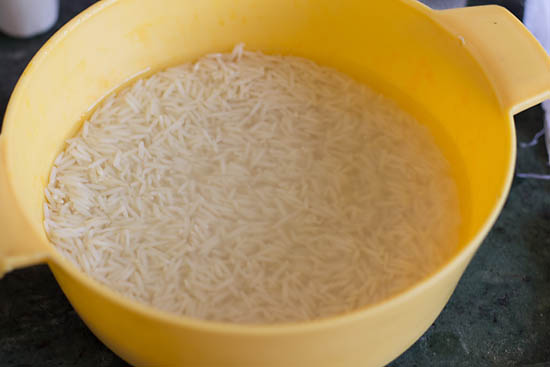
2. Soak the basmati rice for 30-40 mins.
3. In the meanwhile for garnish take some ghee or oil in a pan and fry the chopped onion till dark brown and crispy. Add little sugar which aids in caramelizing the onion faster. Place this aside and reserve for layering.
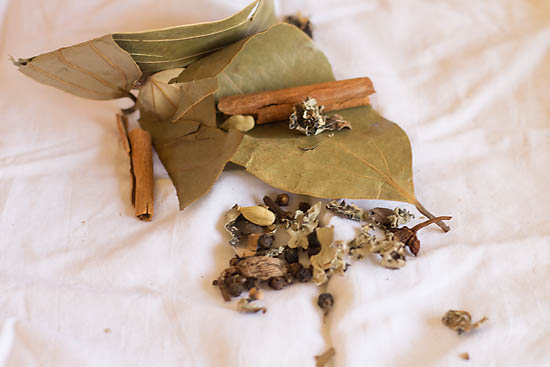
4. First take a big wok or vessel. Add water with few spices ( 1 bayleaf, 2 inch Cinnamon stick, 3 green Cardamom, 1 Mace, 4 Cloves, 4 to 5 Pepper corn). Alternatively you could tie the whole spices in a muslin cloth like a potli. Boil the water with all these whole garam masala.
5. Take water as required to make the basmati rice.
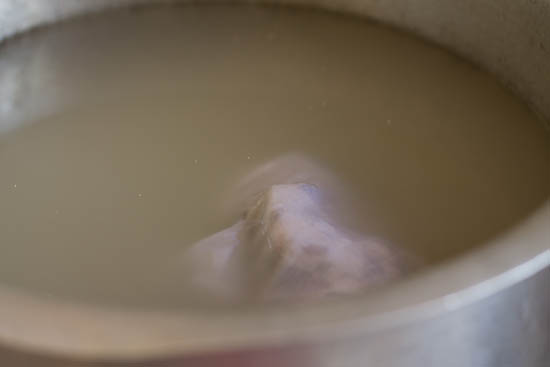
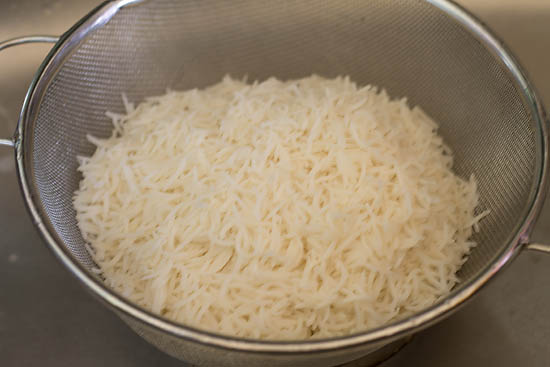
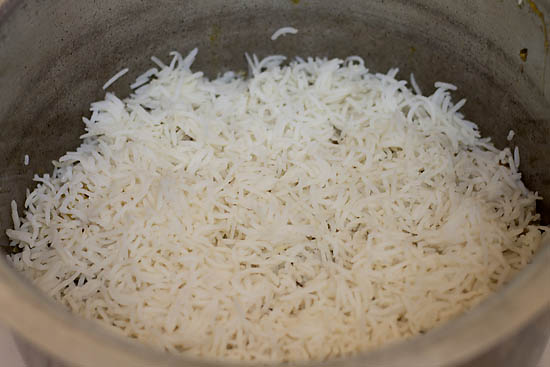
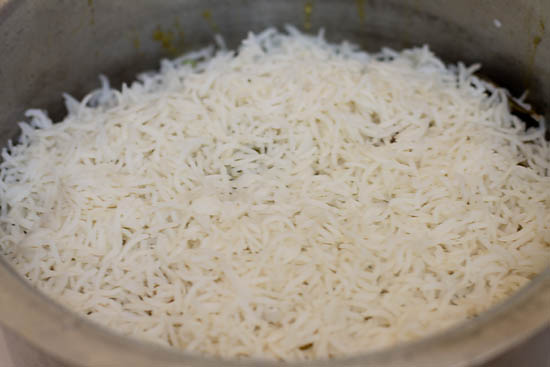
6. Please note you just have to par boil the rice (half cook) or cook upto 70%. Don’t cook the rice completely. Remove from fire once the rice is half cooked. Strain the water and keep the rice aside.
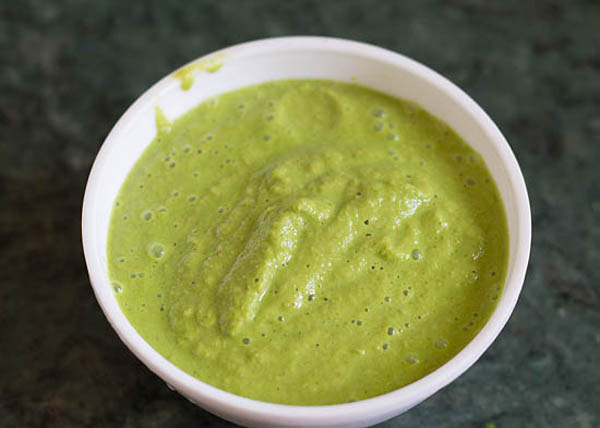
7. For the green paste combine all the ingredients and grind to a smooth paste.
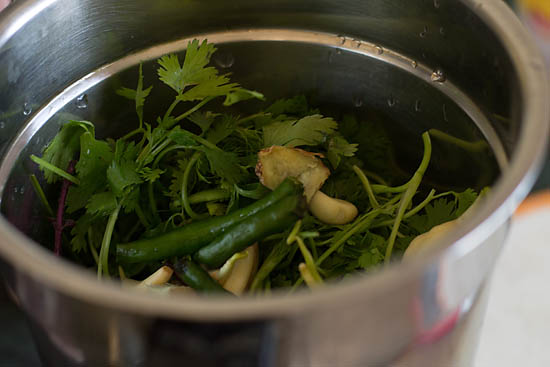
8. Add little water if required. Keep this green paste aside.
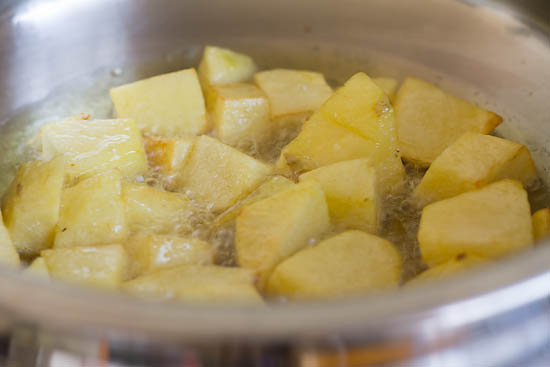
9. Take a heavy bottomed sauce pan heat ghee or oil, Once oil is hot fry add the potatoes.

10. Fry them until golden brown in color.
11. in the same pan add cauliflower florets until golden brown in color.

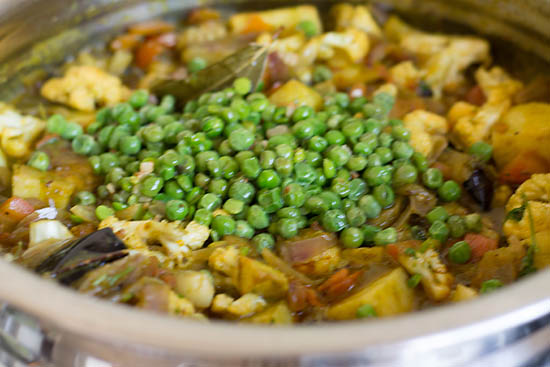
12. Time to fry the green peas. Fry for 3-4 mins.

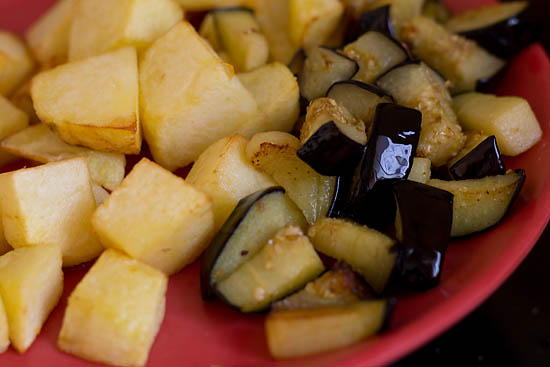
13. This way fry all veggies one by one. Place the fried veggies aside. I have used brinjals as I had lots but it’s optional.
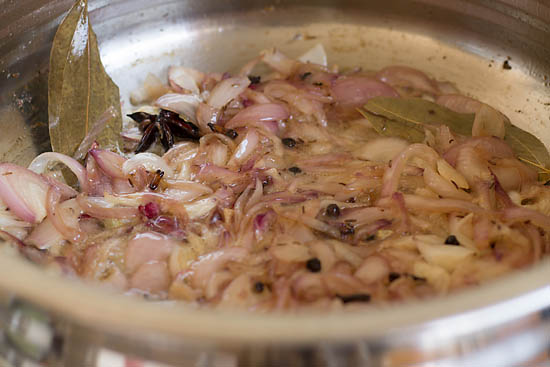
14. In the same pan add some more ghee or oil saute bay leaves, shahi jeera, rest of cloves, pepper corn, cinnamon, stone flower, nag kesar, black cardamom, star anise, nutmeg powder and green cardamom. Fry until they are fragrant and aromatic.

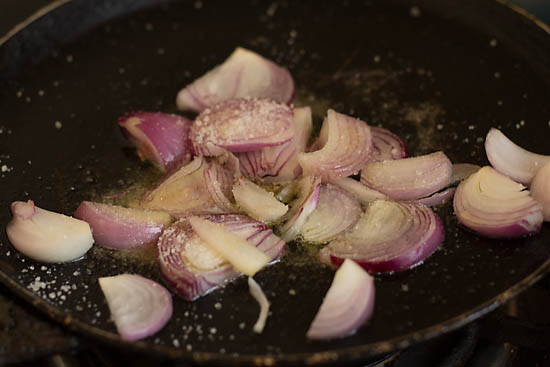
15. Now add chopped onion to it.
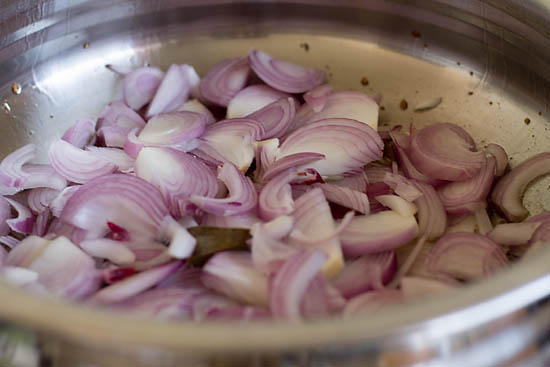
16. Fry them until they are light brown in color but on low flame.
17. Put the chopped tomatoes saute them.
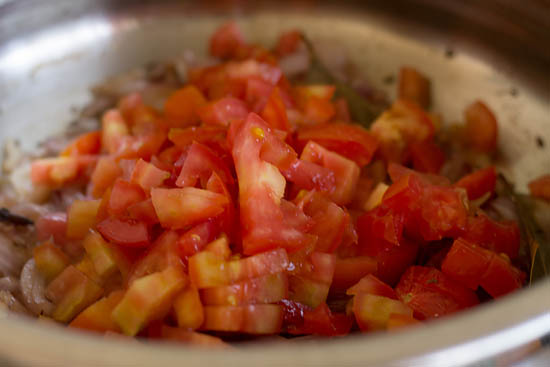
18. Cook the tomatoes until they soften.
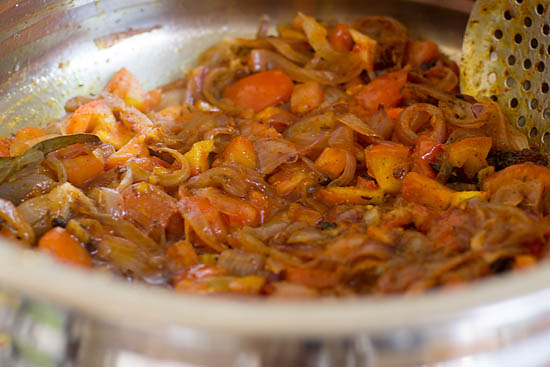
19. Add the biryani masala/garam masala powder, turmeric and red chili powder.
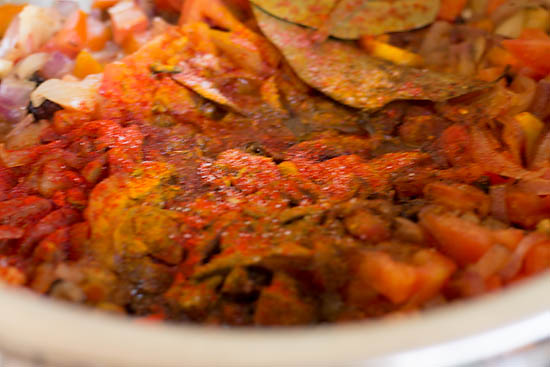
20. Add the green paste along the fried veggies and salt.
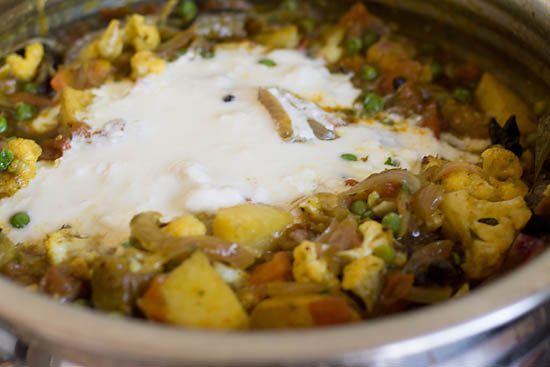
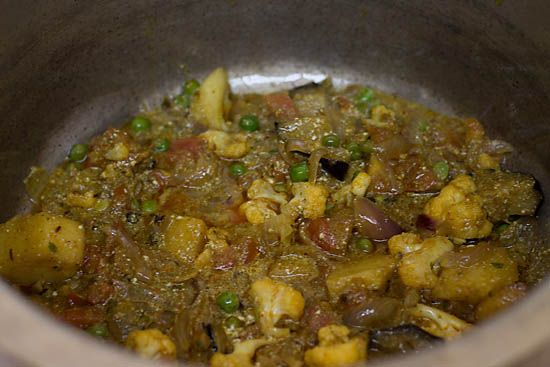
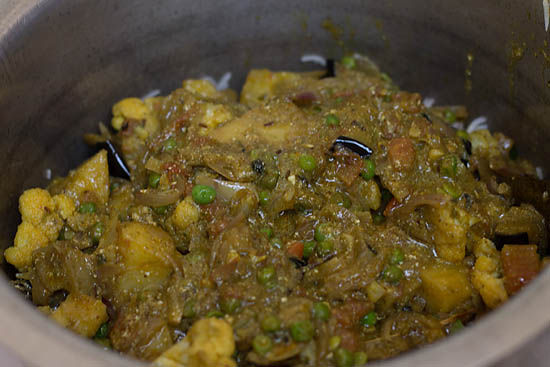
21. Cook for 4-5 mins and add the beaten yogurt. Switch off the gas and combine all of them nicely.
22. Now we will arrange layers for the biryani. Take another big vessel. Now add half of the above veg gravy to it.
23. Cover the gravy with half of parboiled rice.
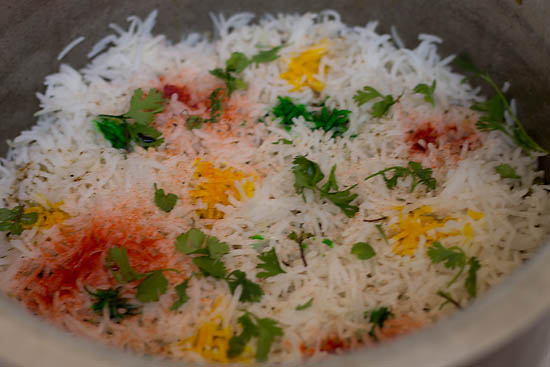
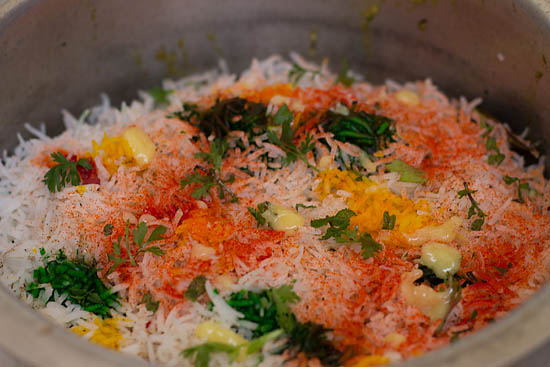
24. Sprinkle a tsp of grounded spice powder, some ghee, some food color, kewra water, some lime juice, few mint leaves and coriander leaves to the rice.
25. Now spread the rest of veg gravy and spread evenly.
26. Spread the rest of parboiled rice evenly covering the gravy.
27. Again sprinkle a tsp of grounded spice powder, some ghee, some food color, kewra water, some lime juice, few mint leaves and coriander leaves to the rice.Don’t forget to garnish with fried onion on the top.
28. Heat a iron tava or a thick metal tava on high fire for 5 mins. Place the stacked layers of biryani vessel on the heated pan. Reduce the heat to low.

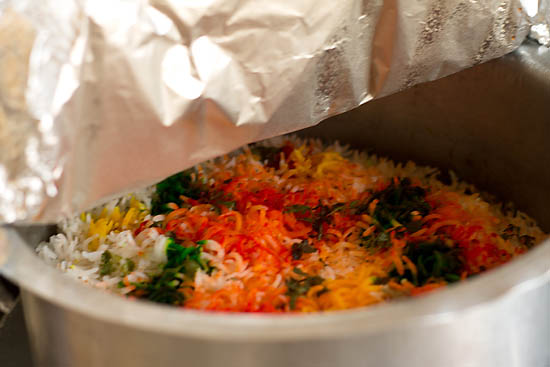
29. Cover the vessel with an aluminium foil, also cover with a metal lid or plate.
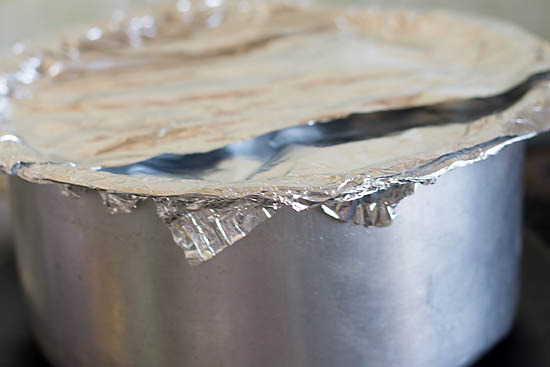
30. I have placed a heavy object so the air doesn’t escape out. Alternatively you could seal the periphery of the vessel with dough covering with a lid and placing an heavy object. This process is important to give dum (pressure) to the biryani.

31. Roughly about 30 mins your Hyderabadi Veg Biryani should be ready.
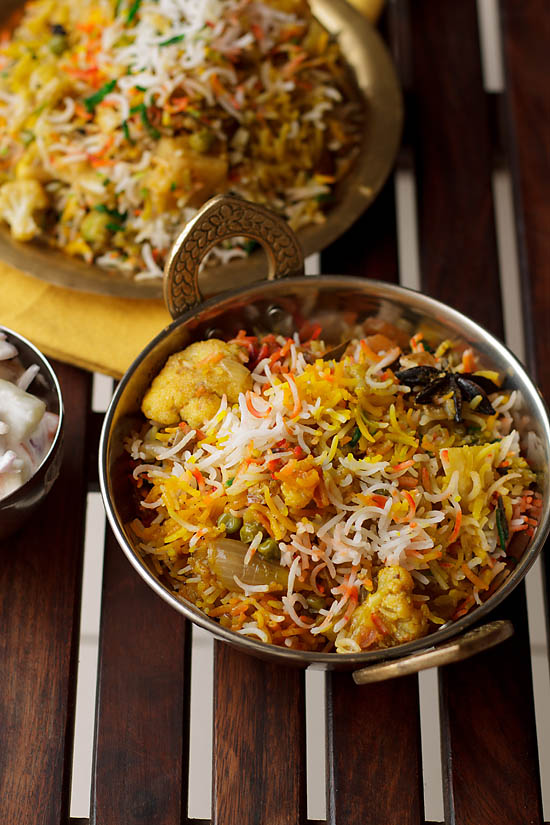
Switch off the gas and serve your veg biryani hot with salad or raita. Garnish your Hyd Veg Biryani with fried onion and coriander leaves.
Hyderabadi Veg Biryani Recipe card below:
- [b]For parboiling the rice:[/b]
- 2 cups basmati rice soaked in water for 30 mins then parboiled
- 1-2 bay leaves
- 4-5 cloves
- 8-10 peppercorn
- 1 black cardamom
- 2-3 mace strands
- 4-5 green cardamom
- 1 cinnamon stick
- a pinch of nutmeg powder
- For the green paste:
- 1 inch ginger
- 6-7 garlic
- 1 cup coriander leaves
- 1 /2 cup mint leaves
- 5-6 green chilies
- [b]For the biryani:[/b]
- 2 tbsp ghee or oil
- 1 cup green peas
- 150 gms long brinjal chopped length wise[b] (optional)[/b]
- 3-4 medium sized potatoes chopped into chunks or wedges
- 1/2 medium sized cauliflower florets
- 6 onion chopped into julienne
- 3 tomatoes chopped finely
- 1 tsp caraway seed
- 2 bay leaves 2 one inch cinnamon stick
- 2-3 nagkesar 2-3 stoneflower
- 3-4 green cardamom
- 2 star anise
- 2 black cardamom
- 7-8 peppercorn
- 3-4 cloves
- a pinch of nutmeg powder
- 1.5 tbsp garam masala powder or biryani masala powder
- 1/2 tsp turmeric
- 1 tsp red chili powder
- 1 cup yogurt beaten until smooth
- 4- 15 mint leaves
- 3 tbsp coriander leaves
- 2 tbsp lime juice
- few drops of vetiver essence
- few drops of color optional 2 tbsp more ghee for layering rice
- salt as required
- [b]For the spice powder[/b]: (this is used to sprinkle while layering the biryani for a fragrant biryani)
- 1 tbsp caraway seed
- 7-8 cloves 4-5 green cardamom
- 2 mace strands a pinch of nutmeg powder
- For the garnish:
- 2 medium sized onion chopped into julienne
- 2 tbsp ghee or oil
- 1 tsp sugar
- salt as per taste
- [b]For the garnish:[/b]
- 2 medium sized onion chopped into julienne
- 1 tsp salt
- 2 tbsp ghee or oil
- For the spice powder dry grind all the ingredients for the spice powder and place aside. Soak the basmati rice for 30-40 mins.
- In the meanwhile for garnish take some ghee or oil in a pan and fry the chopped onion till dark brown and crispy. Add little sugar which aids in caramelizing the onion faster. Place this aside and reserve for layering.
- First take a big wok or vessel. Add water with few spices ( 1 bayleaf, 2 inch Cinnamon stick, 3 green Cardamom, 1 Mace, 4 Cloves, 4 to 5 Pepper corn). Alternatively you could tie the whole spices in a muslin cloth like a potli. Boil the water with all these whole garam masala.
- Take water as required to make the basmati rice.
- Please note you just have to par boil the rice (half cook) or cook upto 70%. Don’t cook the rice completely. Remove from fire once the rice is half cooked. Strain the water and keep the rice aside.
- For the green paste combine all the ingredients and grind to a smooth paste. Add little water if required. Keep this green paste aside.
- Take a heavy bottomed sauce pan heat ghee or oil, Once oil is hot fry the potatoes.
- Fry them until golden brown in color.
- Now fry the brinjal until golden brown in color.
- Remove the brinjal and fry cauliflower florets until golden brown in color.
- Time to fry the green peas. Fry for 3-4 mins. This way fry all veggies one by one.
- In the same ghee or oil saute bay leaves, shahi jeera, rest of cloves, pepper corn, cinnamon, stone flower, nag kesar, black cardamom, star anise, nutmeg powder and green cardamom. Fry until they are fragrant and aromatic.
- Now add chopped onion to it. Fry them until they are light brown in color but on low flame.
- Put the chopped tomatoes saute and cook until they soften.
- Add the 1 tablespoon of biryani masala or garam masala powder, 1/2 teaspoon of turmeric and teaspoon of red chili powder.
- Add the green paste along the fried veggies and salt.
- Cook for 4-5 mins and add the beaten yogurt. Switch off the gas and combine all of them nicely.
- Now we will arrange layers for the biryani. Take another big vessel. Now add half of the above veg gravy to it.
- Cover the gravy with half of parboiled rice.
- Sprinkle a teaspoon of grounded spice powder, some ghee, some food color, kewra water, some lime juice, few mint leaves and coriander leaves to the rice.
- Now spread the rest of veg gravy and spread evenly.
- Spread the rest of parboiled rice evenly covering the gravy.
- Again sprinkle a tsp of grounded spice powder, some ghee, some food color, kewra water, some lime juice, few mint leaves and coriander leaves to the rice.Don’t forget to garnish with fried onion on the top.
- Heat a iron tava or a thick metal tava on high fire for 5 mins. Place the stacked layers of biryani vessel on the heated pan. Reduce the heat to low.
- Cover the vessel with an aluminium foil, also cover with a metal lid or plate. I have placed a heavy object so the air doesn’t escape out. Alternatively you could seal the periphery of the vessel with dough covering with a lid and placing an heavy object. This process is important to give dum (pressure) to the biryani.
- Roughly about 30 mins your Hyderabadi Veg Biryani is ready. Switch off the gas. Serve your veg biryani hot with salad or raita. Garnish your Veg Chicken Biryani with fried onion and coriander leaves.
Yvonne says
Made this over the weekend for a little get together and everyone commented how tasty it was. Thank you for sharing the recipe! Definitely a keeper
maria says
Thanks, Yvonne for your kind words, glad your folks loved the biryani 🙂
Raj says
Fist time in Kitchen for me after long time.
This the best Biriyani I cooked,.
Rozita says
Yups.. All my office mates really loved it.. We are Malaysians & I will make it again this Saturday for our open house to celebrate eid Mubarak
maria says
Pleased to know this Rozita, thanks for your positive feedback 🙂 surely make again.
Rozita says
TQ so much for the recipe.. Tried on Last deepavali celebration at my office.. . It was so delicious ? ?
maria says
Thanks Rozita for your positive feedback 🙂 made me happy.
Lokesh Kapoor says
This is wonderful.
It helped me a lot.
Seriously loved your writing style and efforts to write this.
maria says
Thanks Lokesh for positive views and five star rating 🙂
Jasmine says
Good morning! I can’t wait to try this recipe, it looks amazing!
I am wondering if there is a vegan sub for the cup of yogurt?
Thanks!
maria says
Jasmine good afternoon, thanks for positive feedback, instead of yogurt you could use cashew paste. Just soak 16 to 18 cashews in water for 30 minutes, grind to a smooth paste. You can also use vegan yogurt or almond paste, hope this helps you.
Swapna N says
Can’t we give dum by putting biriyani vessel directly on flame
maria says
Swapna you can keep the vessel directly on the flame for giving dum. But if the bottom of the vessel is not sturdy and thick bottomed.Then there are chances the biryani might stick to the bottom. So be careful on this step, hope this information helps you.
shasha says
Hi Maria
I need to make this for a bday and there ara few problems for me
I haven’t deal with basmati rice ( Im a Sri Lankan and cooking everyday normal rice)
so I’m bit hesitant whether it will be mashed.
how much water you need to add like ?
and also I do not have a iron tava..so If I cook the rice finally in the rice cooker..is it okay ?
also here coriander leaves are rarely founded actually almost not available and some super markets inly
so If I use curry leaves and make the green paste does it will rffect badly ?
maria says
Shasha follow this link here, to cook basmati rice for biryani. This should help you in cooking perfect rice each time you cook. Place a thick metal tawa instead of iron tawa. Just skip coriander leaves and use mint leaves instead. You can use curry leaves but will give a different texture, taste and flavor. Hope this information helps you, let us know how your biryani was? thanks.
shasha mahanama says
Hi Maria,
I need to make this for my boyfriend’s bday because he’s a huge fan of Indian foods and an yes music !!!..I never seen a minute keeping his mouth shut..all the time a very lovely hindi song !!
I have some few problems maria..this is my first time that Im gonna make a biryani ..specially dealing with basmati rice
so I need to clear everything much as possible.
1. here we do not get corrainder leaves..I haven’t seen any vegetable shop..so If I make the paste with some curry leaves. .will the taste spoil ?..
And can I make curry leave paste according to your green paste ?
2…I have a bit problem on cooking the layered rice at last
If I cook in the rice cooker..will it be okay ??
because I do not have that equipment you used to heat
or if I’m baking..how long should bake and the procedure please! !
And I would love if you make a video tutorial on this..Best Regards
Shasha
maria says
Shasha curry leaves will have a different taste and flavor to the biryani. Its better to cook the rice in a big vessel with water as in cooker the rice might get mushy which is not good for biryani.
Yes you can microwave 2 cups of rice with 2 cups of water and microwave for 8-10 mins, till the rice is cooked. But ensure you use the microwave rice bowl with the slotted lid.
Pooja says
Thanks a lot for the reciepe..I tried and it came out very well, friends and family said its superb ,
explanation is really nice..thumbs up 🙂
maria says
Pooja pleased to know your positive views. Thanks for sharing your views and glad your folks liked the veg biryani recipe 🙂
Kankshab says
Can I make it without the kewra water?
maria says
yes kankshab you can make without kewra water it is just to add aroma to the biryani thanks.
Akhil says
The way you have explained and showcased through sequence of photos is really impressive. I liked the texture of the food. It’s really great. Thanks for sharing the recipe.
maria says
Welcome and thankyou Akhil for your positive feedback 🙂
Sonal says
I made it on my husband’s birthday and it was awesome. I used just half of the mentioned ingredients but the result is fabulous. Thanks for the lovely recipe for the vegetarian like us.
maria says
Hi Sonal very pleased to know this glad your husband liked the hyderabadi veg biryani recipe 🙂 thankyou for your kind and positive words and you are welcome.
ritu says
Your method of explanation is too good and the biryani was perfectly cooked could u post recipe of veg biryani in pressure cooker please. I will try chicken biryani and le u know thx so much !
maria says
Very pleased to know this thankyou ritu so much for your kind and positive words 🙂 surely try chciken biryani and let us know how it was? have taken your request for chicken biryani in pressure cooker recipe on our file would try posting soon, allow some time please thanks.
sweetie says
its time consuming but worth the effort thanks for sharing this a great recipe 🙂
maria says
True Sweetie biryani is an effort but it’s worth every bit thankyou so much and you are welcome.
ritu says
we are veg and this is truly a great biryani recipe could you also share parda biryani and veg pulao recipes thanks 🙂 u r doing a great job
maria says
Pleased to know this Ritu 🙂 have taken your request for these recipes and you are welcome.
rose says
second time I am trying this biryani and turns out perfect always thanks for the recipe.
maria says
thankyou so much rose for 5 star rating and positive words.
Meena says
delicious biryani family and kids loved them though it’s lengthy it’s worth it.
maria says
Meenakshi thankyou so muchf or trying so many recipes means a lot to us 🙂 glad your family loved the veg biryani take care.
Kavita says
Superb..Bookmarked shall definitely give it a try.
maria says
Sure Kavita thankyou 🙂
Neeta Pai says
Hi Maria:-)
What is stone flower? Also, nag kesar? Is vetiver essence a must? Thank you! Hoping to make this on upcoming Tuesday. Going shopping this Monday.
maria says
Neeta stone flower is called dagad phool in Indian its black in color and texture is like paper. If you don’t get then just skip. Nag Kesar is also known as cobra saffron and if you don’t get vetiver then add kewra water otherwise skip. Surely try the veg biryani happy shopping and let us know how it was?
Neeta says
You got it…I shall post a picture on FB also. Thank you much for your prompt response.
maria says
Welcome always Neeta 🙂 thank you would await your feedback.
Neeta says
Hi Maria, I went thru the recipe completely and carefully. Still a bit confused about how much Kewra water to use when layering the rice with veg masala. Can you please specify that. I feel that is a key instruction to make or break this rice dish. Thank you very much. You re free to e-mail me if you like. I have plans to cook this for tomorrow.
maria says
Neeta you could use 2 tsp of kewra water on each layer hope this help’s you and thankyou.
Neeta says
Amazing taste and incredible flavors that made my vegetable biryani hater husband love it and eat with a gusto! 2 1/2 hours well spent for a meal that could be served to 18-20 people. Thank you Maria!
maria says
Very pleased to know this Neeta glad your husband loved the biryani 🙂 you are welcome and thankyou for your kind words.
Steph says
If I wanted to double the recipe, how would the cook time change? Thanks!
maria says
Steph around 50 mins app hope this helps you 🙂