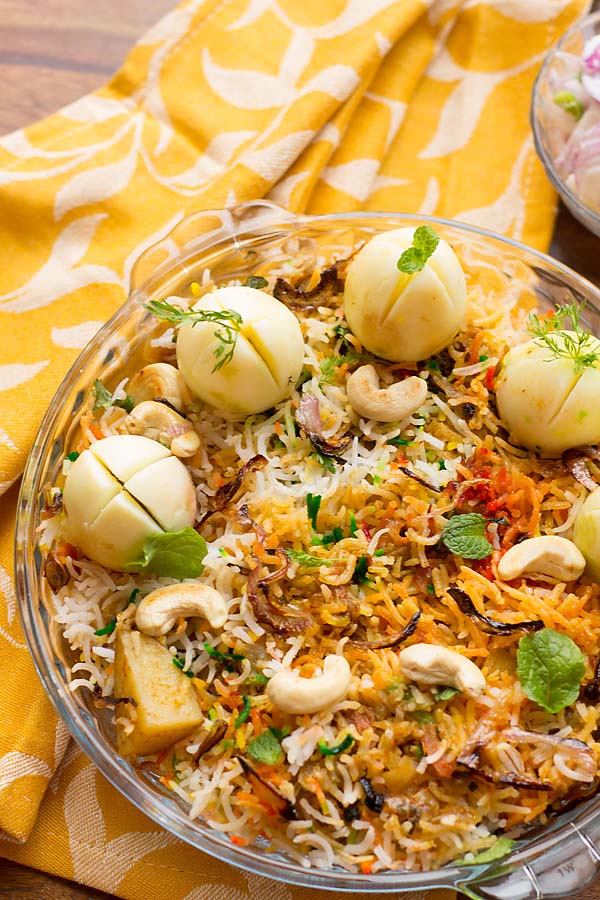
Egg Biryani recipe – a step by step guide and full proof recipe to make an authentic egg biryani recipe in Hyderabadi style. Biryani is a combination of gravy, rice stacked in layers, spiced with whole ground spices and fragrant with kewra water which is cooked in dum. Dum is a special process where the biryani is covered with wheat dough and they are cooked with their own juice, smoke and flavor. Either you could use wheat dough (atta) or cover with a foil and place a heavy weight object so the steam doesn’t escape.
Similar process biryani could be made of chicken, fish, prawns, eggs, potatoes, paneer, vegetables etc. Let me also throw light a pulao cannot be biryani as pulao is just a mixture of rice, veggies and spices. Yeah, sometimes pulao are also cooked with gravy but cannot be termed as a biryani. The major difference between pulao and biryani is biryani cooked on a dum and they are stacked or layered and more richer in gravy and masala. Pulao is generally light and cooked mostly in cooker or pans and without dum. But you won’t be surprised to see pulao termed as a biryani on many sites these days. Guess we should go back to basics and get them right instead of misleading people.
I have adapted and modified this recipe from my own Hyderabad chicken recipe. Credit goes to my mother for this fool proof biryani and one of the most delicious and fragrant biryani each time I have. Another challenge people face while making biryani is the rice used and how are they cooked. The secret to any good biryani is a soft, fluffy and each grain separated rice. You could check this recipe on how to cook rice perfectly each time here. The other secret to a good biryani is they should be aromatic, fragrant and flavorful.
In this recipe, I have used hardboiled eggs. I have added the hard boiled egg towards the last stage of cooking biryani else they would taste overcooked and rubbery. Some people add directly egg with shells in the biryani which I don’t prefer. Better is to hard boil eggs peel and add them towards the last stage. For variation, you could shallow fry them in a little oil and add them in the biryani. If you are a vegetarian then add more veggies instead. Also, this biryani is great for kids and guests.

Learn how to make egg biryani recipe step by step:
- Soak the basmati rice for 1 hr before cooking.

2. Hardboil the eggs click for the recipe here.

3. Allow to cool then peel the eggs.

4. Take little oil and shallow fry the egg for 1-2 mins on low heat. Place aside.

5. First, take a big wok or vessel. Add water with few spices ( 1 bay leaf, 2 inch Cinnamon stick, 3 green Cardamom, 1 Mace, 4 Cloves, 4 to 5 Pepper corn and 1-2 nagkesar). Boil the water with all these garam masalas. Take water as required to make the basmati rice.

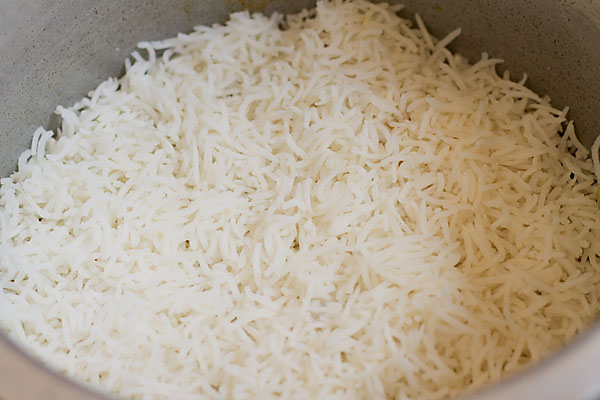
6. Once the rice is parboiled or 80% cooked they should look like this. Don’t cook the rice completely.

7. Switch off the gas and remove them in a colander.

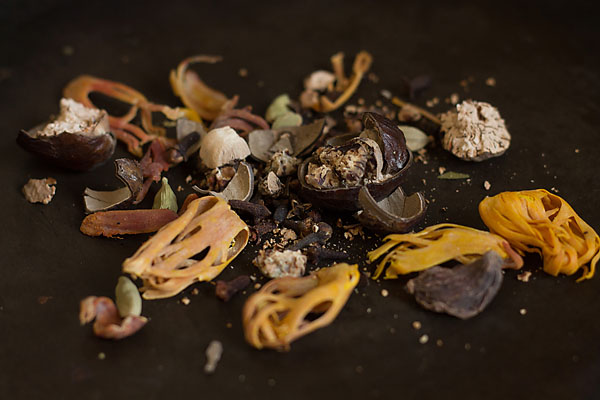
8. Meanwhile, roast all the whole spice for a minute on low heat. Then dry grind them and place aside. This is your aromatic powder to be sprinkle while stacking the biryani.
For Garnishing:
9. Fry the onion until brown in color and place aside. I have slightly burnt them 😉 as we liked the fried browned onion.

10. Also fry the cashews and place aside. Both fried onion and cashews to be added while layering the biryani. Place them aside.

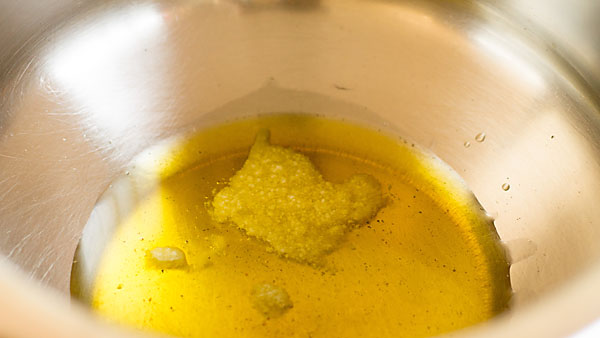
11. Please keep the gas flame on low mode. Now take a big wok or vessel. Add ghee to it.
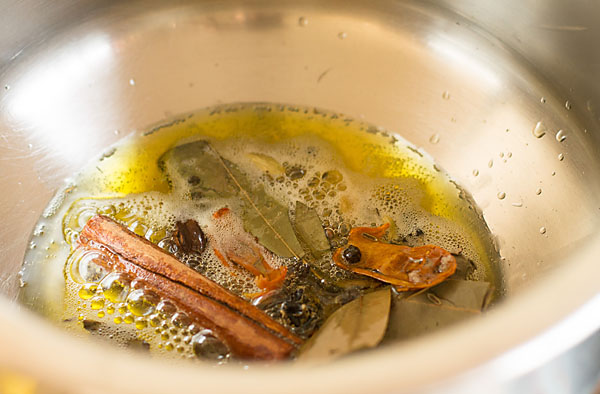
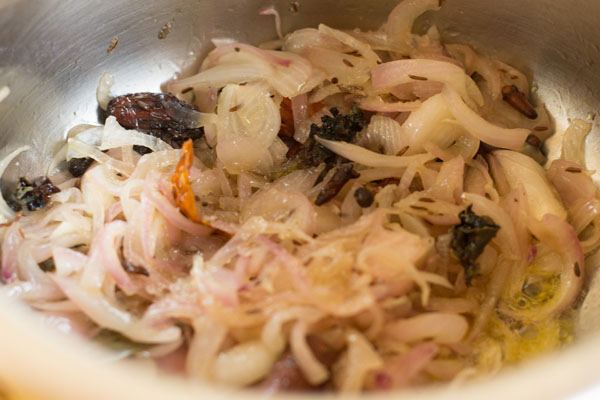
12. Saute 3 Bay leaves, shahi jeera, rest of cloves, peppercorn, cinnamon and green cardamom.
13. After about 2 mins add chopped onion to it.

14. Fry them until they are dark brown in color but on low flame. Combine all of them well.
15. It is time to add tomatoes.

16. Now add all the whole spices and spice powder. Saute tomatoes for a 4-5 minute or until they soften.

17. Put potatoes to them.

18. Add the green grounded paste and mix well.

19. Add yogurt and water. Combine all of them well. Let it cook for 2-3 mins.

20. Let it again cook a minute more. Switch off the gas and keep all the gravy, rice and other ingredient’s handy for assembling or stacking the biryani.

Assembling of Biryani :
21. Now we will arrange layers for the biryani. Take another big vessel. Add half of the above gravy to it.

22. Gently spread half of the parboiled rice to it.

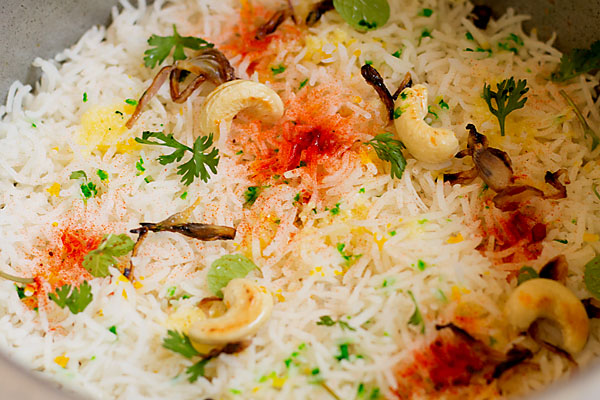
23. Sprinkle some saffron mixed with warm milk Or if using food color to the rice along with some ghee on it. Also add some of fried onion, mint leaves, coriander leaves, fried cashewnuts, kewra water and sprinkle some aromatic powder.
24. Now again spread the rest of gravy on the rice.

26. Finally spread the rest of parboiled rice on it.
27. Finally spread the rest of parboiled rice on it. Again top the rice with rest of ghee, saffron mixed with warm milk or if using food color to the rice along with some ghee on it. Also, add some of the fried onion, mint leaves, coriander leaves, fried cashew nuts, kewra water and sprinkle some aromatic powder.
28. Keep a large heavy bottomed tava or pan on the gas. This process is similar to preheating the pan then placing the vessel to cook.

29. Now place the stacked layers of biryani vessel on the heavy bottomed pan. Now cover with a lid. Also, you could cover with dough covering the edges of the vessel. But We have chosen to cover with an aluminum foil.

30. Then placing a grinding stone on it. If you don’t have a grinding stone you could place any heavy object which is fire proof on the lid.

31. This process is important to give dum (pressure) to the biryani. Roughly about 20 -25 mins your Hyderabadi egg Biryani is ready. When your biryani is ready gently remove the foil and place the eggs. Immediately cover with the foil and weight back.

32. Just before serving the biryani remove the foil as this would keep your biryani hot.

33. Switch off the gas and keep it on low mode for the entire process of making Biryani. Serve your egg biryani hot with salad or raita. Garnish your Hyderabadi Egg Biryani with fried onion, fried cashews and coriander leaves.
If you are looking for more biryani or pulao recipe then do check Hyderabadi chicken biryani, paneer biryani, sprouts biryani, prawns biryani, Hyderabad veg biryani, veg pulao recipe, veg pulao in pressure cooker, prawns pulao, peas pulao, zafrani chicken pulao and mushroom pulao.
Egg biryani recipe card below:
- [b]for biryani[/b]
- 6-7 hard boiled eggs (peeled)
- 250 gms onion chopped
- 125 gm tomatoes chopped
- 100 gm potatoes chopped into chunks
- 125 gm yogurt
- 2 tejpata Leaves (bay leaf)
- 2-3 cloves
- 1 cup of water
- 2-3 nagkesar (cobra saffron) is optional
- 2-3 green cardamom
- 2 cinnamon sticks
- 1/2 mace</ (javitri)
- 6-7 peppercorn kalimiri
- 1/2 tbsp shahi jeera
- 1/2 tbsp biryani garam masala powder
- 1/4th tsp kashmiri red chili powder
- 1/2 t/s turmeric
- 2 tbsp ghee or oil
- 2 strands of saffron mixed with warm milk or 1 tbsp orange food color
- salt as per taste
- for rice
- [b]for the green paste:[/b]
- 1/4th cup of mint leaves
- 1/4th cup of coriander leaves
- 1-2 green chilies
- 1 inch ginger
- 5-6 garlic cloves
- [b]for cooking parboiled rice for biryani[/b]
- 250 gm basmati rice soaked in water for 1 hour
- 2 green cardamom
- 3-4 cloves
- 5-6 peppercorn
- 1 bayleaf
- 1-2 mace blades
- 1 cinnamon stick
- water as required
- [b]for aromatic powder[/b]
- 1 nutmeg
- 4 mace blade
- 2 black cardamom
- 4-5 green cardamom
- 5-6 cloves
- Garnishing:
- 1 cup onion juliennes
- 12-15 cashew
- few coriander leaves
- Soak the basmati rice for 1 hr before cooking.
- Hard boil the eggs..
- Allow to cool then peel the eggs.
- Take little oil and shallow fry the egg for 1-2 mins on low heat. Place aside.
- First, take a big wok or vessel. Add water with few spices ( 1 bay leaf, 2 inch Cinnamon stick, 3 green Cardamom, 1 Mace, 4 Cloves, 4 to 5 Pepper corn and 1-2 nagkesar.
- Boil the water with all these garam masalas. Take water as required to make the basmati rice.
- Once the rice is parboiled or 80% cooked they should look like this. Don’t cook the rice completely.
- Switch off the gas and remove them on a colander.
- Meanwhile, roast all the whole spice for a minute on low heat. Then dry grind them and place aside. This is your aromatic powder to be sprinkled while stacking the biryani.
- Fry the onion until brown in color and place aside.
- Also fry the cashews and place aside. Both fried onion and cashews to be added while layering the biryani. Place them aside.
- Please keep the gas flame on low mode. Now take a big wok or vessel.
- Add ghee to it.
- Saute 3 Bay leaves, shahi jeera, rest of cloves, peppercorn, cinnamon and green cardamom.
- After about 2 mins add chopped onion to it.
- Fry them until they are dark brown in color but on low flame. Combine all of them well.
- It is time to add tomatoes.
- Now add all the whole spices and spice powder. Saute tomatoes for a minute or until they soften.
- Put potatoes to them.
- Add the green grounded paste and mix well.
- Add yogurt and water. Combine all of them well. Let it cook for 2-3 mins.
- Put potatoes to them. Let it again cook for a minute more.
- Now we will arrange layers for the biryani. Take another big vessel.
- Now add half of the above gravy to it.
- Gently spread half of the parboiled rice to it.
- Sprinkle some saffron mixed with warm milk or if using food color to the rice along with some ghee on it. Also add some of fried onion, mint leaves, coriander leaves, fried cashewnuts, few drops kewra water and sprinkle some aromatic powder.
- Now again spread the rest of gravy on the rice.
- Finally spread the rest of parboiled rice on it. Again top the rice with rest of ghee, saffron mixed with warm milk or if using food color to the rice along with some ghee on it.
- Also</g> add some of fried onion, mint leaves, coriander leaves, fried cashewnuts, kewra water and sprinkle some aromatic powder.
- Place it on low heat. Keep a large heavy bottomed tava or pan on the gas. This process is similar to preheating the pan then place the biryani vessel to cook.
- Now place the stacked layers of biryani vessel on the heavy bottomed pan .
- Now cover with a lid. Also, you could cover with dough covering the edges of the vessel. But We have chosen to cover with a lid and then placing a grinding stone on it. If you don’t have a grinding stone you could place any heavy object which is fire proof on the lid. This process is important to give dum (pressure) to the biryani.
- Roughly about 20 -25 mins your Hyderabadi egg Biryani is ready.
- Just gently remove the foil and place the boiled eggs leaving some place from each other over the biryani. Cover soon with the lid and foil covering and place the weight again.
- Switch off the gas and keep it on low mode for the entire process of making Biryani. Serve hot with salad or raita.Garnish your Hyderabadi Egg Biryani with fried onion, fried onion, cashews and coriander leaves.
Roseline Nunes says
Hi Maria
Thank you for the lovely recipe I did try your egg biryani recipe it’s very easy to follow but i did some slight changes as we don’t eat spicy so reduced the green chilli however look wise my biryani turned superb but taste was lacking can you please advice me what went wrong
maria says
Hi Roseline,
Thanks for trying the Biryani could be possible the rice proportion must have increased then the gravy portion. Also chilies, spices could have been altered. Next time keep little gravy aside for backup, hope this helps you.
Regards,
Maria
Robert Clayton says
I am a big fan of ur blog have tried many recipes this egg biryani looks lovely and will try this soon. Could u post dabeli recipes pls thanks.
maria says
We have taken your request for dabeli pav recipe allow us some time to post the recipe and thankyou 🙂